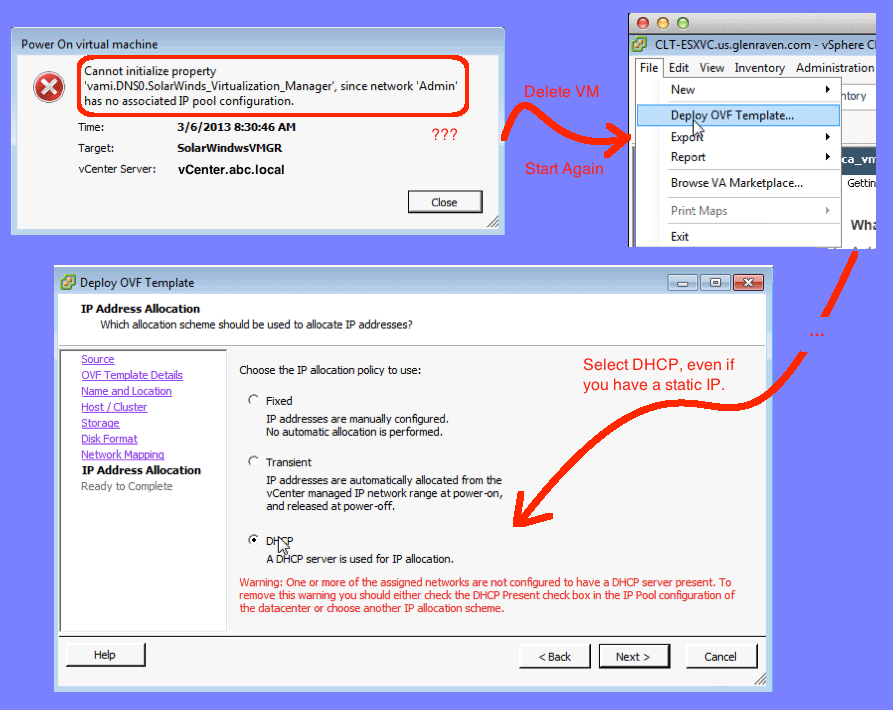
Normally, installing a virtual machine appliance is easy. Just download, deploy, answer a few basic questions, and the VMA is running. But, not today.
Today, I went to install the newest SolarWinds VMA for Virtualization Management and promptly received the error “Cannot initialize property. ‘vamp.DNS0.SolarWindows_Virtualization_Manager’, since network has no associated IP pool configuration.” The first time is happened I thought, “perhaps I clicked something mistakenly”. So, I proceed to delete the virtual machine, and re-install, paying close attention to the directions. Same exact error when I attempted to start the freshly installed VMA!
If you are in this situation, this is how I got the SolarWinds VMA installation to actually work. Of course, you begin by deleting the VMA that is giving you the error.
- Delete the erred VMA:
- Highlight the VMA that won’t start within the vSphere client.
- Right-click and select Delete.
- Confirm the validation prompts.
- Begin deploying the VMA again:
- Within the vSphere client, from the File menu | select the “Deploy OVF” menu item
- Browse to the downloaded VMA file and click the Next button
- Click the Next button
- Enter a name for your new virtual machine
- Highlight the inventory location you want to use (any one will probably do)
and click the Next button - Highlight the cluster or host you want to use and click the Next button
- Highlight a storage location and click the Next button
- Keep the default of “Thin Provision” and click the Next button
- Highlight a network on your LAN and click the Next button
- Use DHCP, even if you have a designated static IP address:
- Select the DHCP radio button and click the Next button
- Click the Finish button
- Deployment completes:
- The machine will deploy after you click the Finish button
- Click the close button to confirm the deployment is complete
- Start the new VMA by right-clicking | Power menu | Start menu item
So, as you can guess, the problem happens whenever you use the deployment wizard to select a static IP address. You must always deploy using DHCP, and then edit the resulting virtual machine to assign the static IP, if you want a static IP.
Here are the final steps:
- Respond to the first boot up sequence:
- Click the virtual machine you just created in iSphere client, and select the
“Use Console” menu item - If you don’t have DHCP on that network, the machine will say “No Networking
Detected…” in red bold letters - Use your cursor to select the “Configure Network” menu item on the bottom left
of your screen - Enter a valid static IPv4 address, such as 10.10.10.100
- Enter your gateway on that network, such as 10.10.10.1
- Enter your first DNS server, such as 10.10.10.20
- Enter you second DNS server, such as 10.10.10.21
- Enter you local hostname (I made it the same as the name within iSphere, no
embedded spaces) - If there is no proxy server to reach the internet, enter “N” for no.
- Validate that all entries are correct, and enter “Y” for yes.
- Click the virtual machine you just created in iSphere client, and select the
- Test your new VMA:
- You should set the time zone, if its incorrect
- Then, close the console window
- Open an Internet browser
- Enter https://10.10.10.100 (or whatever you assigned as the static IP address)
The result should be a SolarWinds webpage. Of course, you can add your new VMA name as a DNS entry, and then get a prettier URL. SolarWinds is already aware of this networking problem, and has documented the work around in their knowledge base here: http://knowledgebase.solarwinds.com/kb/questions/3556/.
