You may have noticed (or perhaps you haven’t) that the ODBC administrative
screen found in Control Panel |Administrative Tools | Data Sources (ODBC) are
actually 64-bit drivers under Windows Server 2008R2. I noticed this factoid
today while installing VMware Update Manager on SQL Server Standard. It turns
out that even the latest version 5.1 Update Manager requires a 32-bit connection
to its database.
Other legacy software might have the same limitations. So, how do you create a
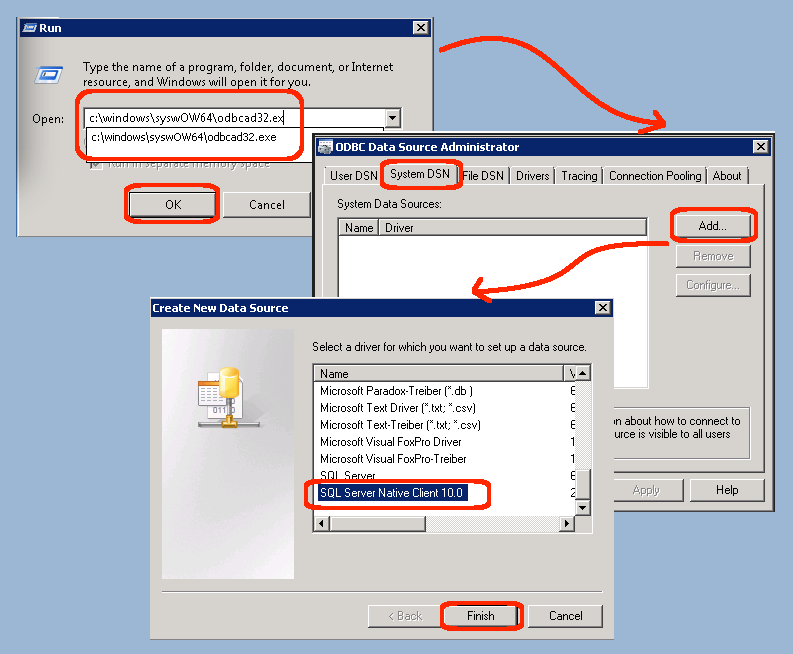
32-bit ODBC System DSN entry? The following provides step-by-step instructions:
- Run the old ODBC administrative interface:
- From the Start menu | select the Run menu item.
- Enter the path c:\windows\syswow64\odbcad32.exe in the dialog box.
(Note: if you have installed windows in a non-default directory name, you need
to correct the above path) - Press the OK button
- Initiate the add ODBC wizard:
- Goto the System DSN tab in the “ODBC Data Source Administrator” dialog box.
- Click the Add button.
- Scroll to “SQL Server Native Client…” and highlight this entry.
- Click the Finish button.
- Define the connection parameters:
- Enter the name of the DSN (better to not include spaces).
- Enter the description of the DSN (spaces are OK).
- Select your server from the dropdown.
- Click the Next button.
- Enter appropriate credentials to your SQL Server (refer to your application’s
requirements). - Click the Next button.
- Validate the ODBC connection:
- As long as you left the default “Connect to SQL Server…” checkbox checked, an
attempt will be made to use the new DSN. - If you get a “Connection failed” error, click the Back button and check the
login credentials to the database.
- As long as you left the default “Connect to SQL Server…” checkbox checked, an
If the connection succeeds, you are done! Now, you can use this 32-bit ODBC
source for your applications that are unable to use the new 64-bit DSN definitions.
