More people I know are taking the plunge and transitioning to the MacBook, MacBook Air, or iMac desktop. So, I have recently been receiving more Apple OSX “how to” questions. This post describes how to setup a network printer in either 10.6.x or 10.8.x. The only real difference between the two setups is that the “Print & Fax” icon has been renamed to “Print & Scan”. Note that if you have a printer that is setup to provide Bonjour, then all you need to do is the following:
- Open the “Add Printer” dialog box:
- Click the “System Preferences” icon.
- Click the “Print & Fax” icon.
(Note: In 10.8.x, click the “Print & Scan” icon.) - Click the “Unlock” icon if locked, and enter password when prompted.
- Click the “+” (plus) button to open the “Add Printer” dialog box.
- If the printer is using Bonjour:
- If the printer is using Bonjour on your network, then it should show up in the “Default” tab.
- Highlight the printer you want to add, and click the “Add” button.
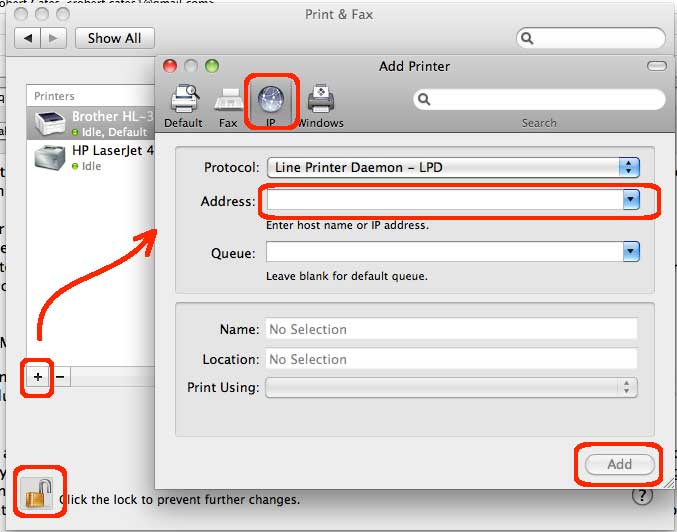
However, even if your printer is not using Bonjour, you can still add it as long as it has valid drivers and an IP network address. So, for instance, my old HP 4M that is network enabled can still be used! Refer to the screen shot for the following.
- If the printer has an IP network address:
- Goto the “IP” tab in the “Add Printer” dialog box.
- Enter the printer’s network address (e.g. 10.10.10.1 or whatever) in the Address field.
- Click the Add button.
- Optionally, to set your added printer as the default printer:
- Once added, highlight the new printer in your list of printers.
- Right-click the new printer.
- Select the “Set default printer” menu item.
Finally, you can easily remove printers that are no longer used. Simply highlight the printer to be removed and click the “-” (minus) button. In most cases, the operating system will automatically locate the correct printer drivers.
