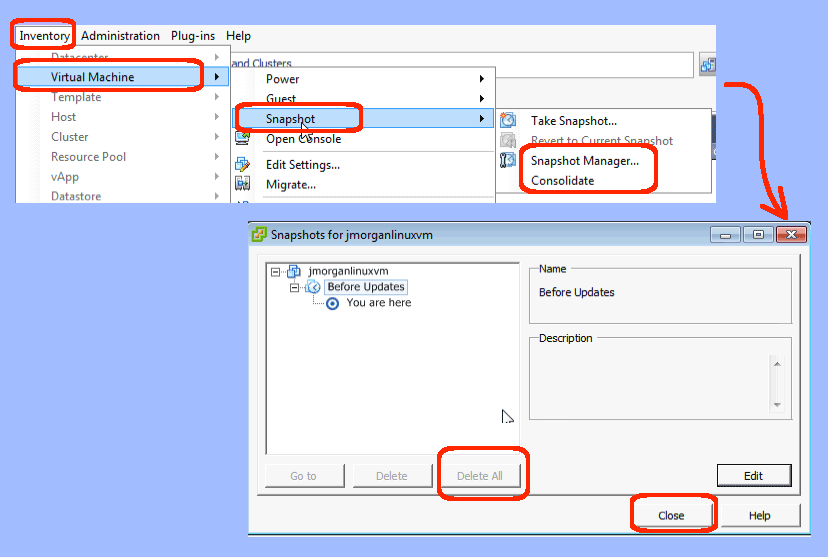
So, VMware 5.0 has a new Consolidate menu item located in Inventory | Virtual Machine | Snapshot menu. What does it do? Before I get to that, let’s review what the other menu items do, because Consolidate only makes sense after you understand what can go wrong with snapshots.
First, snapshots are a terrific feature. They allow me to checkpoint before a major change, such as a software upgrade, so that I can effectively remove the software if the upgrade has unintended features. For instance, maybe I want to test a new software package. I can take a snapshot, install the software, test the software, and then return to the saved snapshot. The last step removes the new software and all the test data, such that not a trace exists in my virtual machine. Taking a snapshot requires the following steps, assuming you have installed VMware Tools in the vm:
- Login to VMware iSphere Client
- Highlight the virtual machine (vm) you want to Snapshot:
- Navigate to Home | Inventory | Hosts and Clusters
- Scroll down and highlight your virtual machine
- Take the Snapshot:
- Use Inventory | Virtual Machine | Snapshot | Take Snapshot menu item
- Enter a name such as “Before Update” or similar
- Enter a description with more details… this is an optional step
- If the machine is running, check the “Quiesce guest file system…” checkbox
(Note: Alternatively, you can shutdown the virtual machine before snapping) - Click the OK button
Once you start using snapshots, you might get addicted to them. You can seemingly take as many as you want. But, there is a performance penalty if you take too many. Under the covers, each snapshot creates a new file. If you have taken hundreds of snaps, then there are hundreds of files for VMware to content with. So, snapshots are not backups, and you should get into the good habit of removing unnecessary ones. To remove a snapshot, do the following:
- Open the Snapshot Manager:
- Assuming your virtual machine is already highlighted…
- Use Inventory | Virtual Machine | Snapshot | Snapshot Manager menu item
- Remove the unneeded snapshots:
- Highlight the snapshot you no longer need.
- Click the Delete button.
- Click the Close button.
But, you will notice there is no multi-select capability via the GUI interface. So, if you are having performance issues, and need to collapse your entire tree, there is a quicker way. To delete all the snapshots, retaining only the latest version of your virtual machine, do the following:
- Remove all the snapshots:
- Assuming your virtual machine is already highlighted…
- Use Inventory | Virtual Machine | Snapshot | Snapshot Manager menu item
- Click the Delete All button.
- Click the Close button.
If you have a considerable number of snapshots, or if you have a considerable number of changes in a limited number of snaps, then this collapse process is going to take minutes not seconds. In fact, when I upgraded my linux virtual machine from version redhat 5.7 to 5.9, removing the before updates snapshot took me fifteen minutes. So, be patient.
All the above features were available in VMware 4.x and are not new to 5.x. But, sometimes removing the snapshots does not work. One of the snapshots hangs and refuses to be removed, often making the virtual machine unbootable in the process. Previously, resolving this took a call to VMware product support. Now, the resolution is to use the new Consolidate menu item, as follows:
- Remove stubborn snapshots:
- Assuming your virtual machine is already highlighted…
- Use Inventory | Virtual Machine | Snapshot | Consolidate menu item
- Click the Yes button to confirm the consolidation
But, how will you know if this is needed? Helpfully, VMware has added a new status in the Summary tab when you have your virtual machine highlighted. The new status message says, “Virtual machine disks consolidation is needed.”
