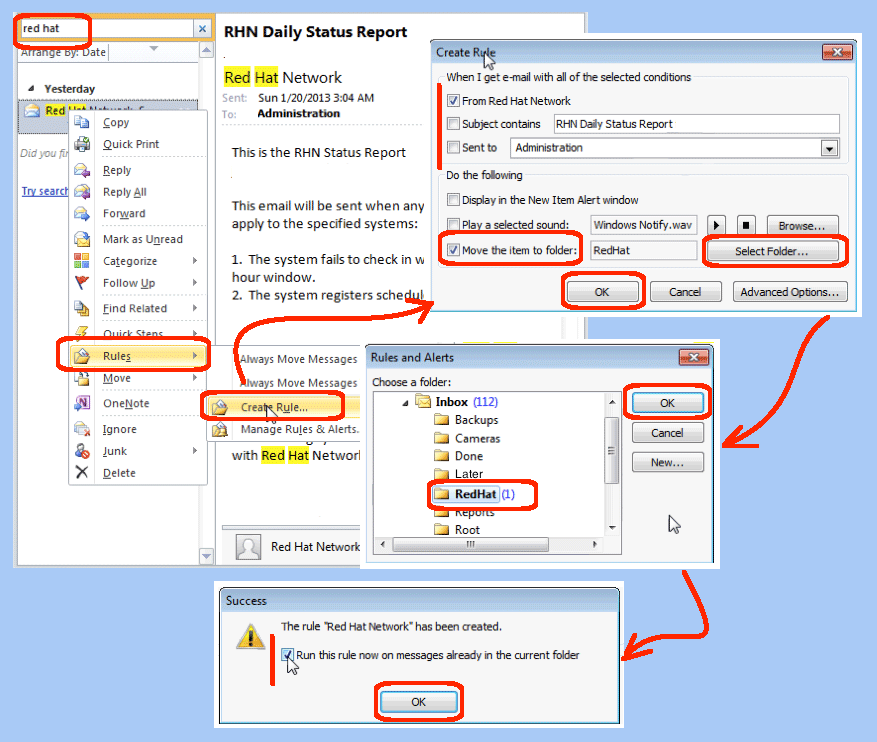
I get a lot of emails every day. Some of these emails are informational automated emails, which I want as reference, but don’t want cluttering up my inbox. This blog discusses how to define Outlook rules so that these emails automatically move from the inbox to their designated folder. The screen shots are from Outlook 2010, but a similar capability exists in 2007 and 2003.
- Locate an email you want moved:
- Open the Outlook 2010 application.
- In the find window, search for a keyword, in my example “red hat”.
- Validate your results, highlight one of the emails that you want moved.
- Initiate the Create Rule wizard.
- Right click an email you want moved.
- Select the Rule menu | Create Rules menu item.
- Decide the selection conditions:
- Because you highlighted an email, the Create Rule wizard is populated.
- Check to select all emails from a particular sender (“Red Hat Network” in my example).
- Or, you can select by the email subject.
- Or, you can select by the email recipient’s name.
- Move the item to a folder:
- Check the checkbox called “Move the item to a folder”.
- Click the “Select Folder” button.
- Highlight the existing folder you want (“RedHat” in my example).
- Click the OK button.
- Click the OK button.
- Run the new rule now:
- Check the “Run this rule now…” checkbox to test your rule.
- Click the OK button.
- Validate that the emails you intended have moved to their new folder.
Of course, step five is optional. You could decide not to run the rule immediately. However, I think its a good idea to immediately test that the rule is neither too broad nor too narrow. Additionally, in step four, if you don’t have an appropriate folder already created, you can use the New button to create one.
